
Cake Recipe
17 Best Steps To Make Stitch Cake For Your Birthday
Jun
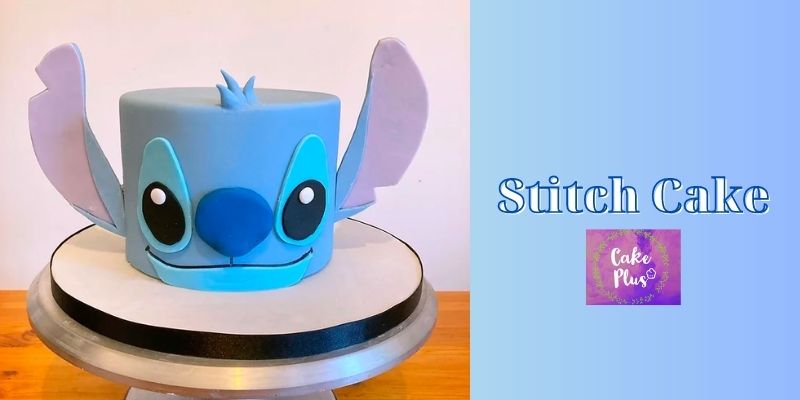
Stitch is adored by all, right? bizarre and insane but devoted. Furthermore, also cute and fluffy!Therefore, if he is yours, you can make him into a cake. The Cakepluss.com ‘s directions for building your own Stitch Cake are available here. We used a three-layer, 6″ round sponge cake with a height of about 4 12″. This is a terrific height for this size cake since it gives Stitch’s face really beautiful proportions.
Ingredients you need to make Stitch Cake
- Round cake board, 11″
- White fondant, 250g
- 800g light cornflour blue fondant (made by combining a little baby blue and purple food coloring).
- 25g of deep blue fondant
-
25g of light purple fondant
- 25g fondant in light blue
- 20 grams of black fondant
- Tylo power
- Edible glue or a little water cup
- Painting brush
- Two wooden skewers
Instructions for making Stitch Cake

Step 1. Spread white fondant over your Stitch Cake board and let it dry. Use this tutorial to learn how to accomplish this.
Step 2. To prepare the Stitch Cake for icing, adhere it to the board and coat it with crumb coat. This tutorial can be helpful to you.
Step 3. Using this guide, you can cover your cake in the light cornflour blue fondant after your final crumb coat has dried.
Step 4. To make Stitch’s face fit on your cake, print out or create an image of it. The tops of the eyes should be positioned between 1 and 1 1/2 inches below the cake’s top. After that, separate the pieces.
Step 5. Cut out the two eye shapes and the mouth from the light blue fondant by rolling it out to a thickness of about 3mm. Once they have been properly cut out, set them aside to air out a bit.
Step 6. Cut out the two pupils for the eyes from the black fondant by rolling it out to a comparable thickness.
Step 7. Using your pattern as a guide, attach the black pupils to the larger pieces of light blue by brushing them with a small amount of edible glue (or water). Next, roll 2 pea-sized portions of white fondant, then slightly flatten them. To give Stitch’s eyes a tiny glitter, stick them to the tops of the black pupils!
Step 8. After that, remove the nose! Roll out the dark cornmeal blue frosting, which can be slightly thicker (about 5mm). Once it has been cut out, gently pat the edges with your fingertips to round them off a bit.
Step 9. To around 100g of cornflour blue icing, add about 14 tsp of tylo powder before using the same method to form the ears. The tylo powder will aid in the icing’s firmer setting, which is what we want the ears to do. Cut out the entire blue ear shape, which should be around 5mm thick, before cutting out the smaller outside portion of the same thickness. Cut out the interior portion in purple on a thinner piece of fondant. Before you add the ears to the cake, you should give them at least a couple of hours to harden.
Step 10. Attach the other elements on the Stitch Cake while you wait for the ears to dry. As a suitable starting point for the other parts, start with the mouth at the bottom. Draw a thin, gentle line (approximately 1 cm) from the center of the mouth upwards using a boning tool or a knife. The top of the mouth should then be drawn along to give it some dimension using an edible black pen.
Step 11. Make the top of this line the nose. You might need to hold in place for a few seconds to ensure that the nose sticks because it might be a little hefty.
Step 12. Stick the eyes next, one on either side of the nose. To position the eyes properly, align the bottom of the eyes with the bottom of the nose almost exactly. Make three balls the size of a Malteaser using the cornflour blue frosting. Roll the balls gently on one side to create a teardrop-shaped shape. To make some hair tufts, repeat the process with all three balls. These can be positioned in the center of the cake’s top edge.
Step 13. After the ears have dried, arrange them against the Stitch Cake in the desired position. To help you remember where they should go, gently press them into the cake once they are in the proper location.

Step 14. With one hand holding an ear against the cake, insert a skewer into the Stitch Cake with the other while guiding the skewer along the rear of the ear. To help you remember the angle the skewer has to be at, create a tiny note with a pencil. The opposing side should follow suit.
Step 15. Place the ears on the skewer facing down and coat them with royal icing. After that, align it with the earmark and secure it in place. To ensure that the entire skewer adheres to the back of the ear, make sure there is enough royal icing on it. The opposing side should follow suit.
Step 16. After they have dried, carefully place the ears into the cake, putting a bit extra royal icing on the portion of the ear that will be in contact with the cake. Have some royal icing on available to use to put the skewers back into place if they start to shift slightly as you position the ear. Fold a sheet of kitchen paper twice, then tuck it under the ears for support as the royal icing sets to help hold the ears in place.
Step 17. When the ears are fully developed, take off the cooking towel. Ribbon should be used to complete the board. A very adorable Stitch cake!