
Cake Recipe
Spongebob Cake: 3 Parts to Complete this Wonderful Cake
Jul
A kid-friendly television program features the animated character SpongeBob SquarePants. SpongeBob, a sea sponge that is rectangular and yellow and resides at the ocean’s bottom, serves as the main character. For a child’s birthday party or other celebration, a Spongebob Cake is a wonderful way to adorn a cake. This kind of cake is actually fairly easy to prepare, despite the fact that it needs a lot of little parts. Below is the Cakepluss.com ‘s Spongebob Cake Recipe:
Spongebob Cake: 3 Parts to Complete this Wonderful Cake
Part 1: Cake-baking

Step 1: Gather your materials. Start with three standard rectangular cakes to create a Spongebob Cake. The cake is then decorated and given the distinctive SpongeBob features using fondant once the primary shape has been created by layering the cakes. You will require the ingredients, as well as some kitchenware, to make the cakes.
- A 350 F (177 C) prepared oven
- Small and large bowl
- Hand blender
- Grease three wire cooling racks and sift three rectangular cake pans measuring 7 by 11 inches (18 by 28 cm) each.
Step 2: Creaming the butter and sugar. For one to two minutes, whip the butter with a hand mixer set to medium speed in a sizable mixing basin. Add the sugar and beat for a further seven minutes. If you don’t have a hand mixer, you can use a whisk or a stand mixer.
Step 3. Include the eggs. Remove any shell fragments that may fall into a small bowl after breaking one egg into it. Then combine the butter and sugar with the egg. At medium speed, beat the mixture until it is completely integrated. Repeat the process, adding each egg one at a time, with the remaining eggs.
Step 4: Include the milk and flour. In the basin containing the eggs, butter, and sugar, sift half of the flour. All of the components should only be barely combined after beating the mixture on medium speed. After that, add half the milk and keep mixing to combine the ingredients. The remaining flour should be sifted in and then the remaining milk should be beaten in.
Step 5: Add the vanilla. The mixture should be beaten for a further minute to include all of the components. As soon as everything is thoroughly blended and all lumps have disappeared, stop.
Step 6: Spoon the batter into the cakes and bake them. All three of the Spongebob Cake pans should be greased equally with the batter. To level the batter, tap the cake pans against a flat surface. The cakes should bake for 25 to 30 minutes after being placed in the preheated oven. A toothpick put into the center of the cake should come out clean when it has finished baking.
Step 7. Let the Spongebob Cake cool. Remove the cakes from the oven when they are finished baking and leave them to cool for 10 minutes. The Spongebob Cake should then be turned out onto the wire cooling racks and let to cool for one to two hours, or until room temperature.
Part 2: Making the frosting and fondant
Step 1: Melt the marshmallows. By placing a sizable glass bowl inside a medium saucepan that has one inch (2.5 cm) of water in it, you can create a double boiler. Warm up the double boiler over medium heat while adding the marshmallows and water to the bowl. As the marshmallows melt, stir often, continuing until they are completely melted and smooth.
Step 2: Add the candy melts. Remove the double boiler from the heat as soon as the marshmallows are completely melted. Place the bowl on a mat or surface that can withstand heat. While the marshmallow is still heated, drizzle in the candy melts and stir until well melted and blended.
Step 3: Make the dough. Combine the marshmallow and sugar mixture. To incorporate all of the sugar, stir with a wooden spoon. Then, spread the dough out on a level surface that has been coated with icing sugar. The materials should be mixed up into a soft, sticky dough.
Step 4: Let the dough rest. Vegetable shortening should be spread thinly over the dough. Wrap a thick layer of plastic wrap around the dough. Put the dough in a plastic bag that can be sealed, remove all the air, and then seal the bag. After that, put the dough in the refrigerator to chill and rest for at least four hours.
Step 5: Divide the fondant. Remove the dough from the refrigerator and let it come to room temperature for 30 minutes after giving it some time to rest. The fondant should now be divided into five portions using a sharp knife.
Step 6: Tint the fondant. Place the biggest chunk of fondant on a flat surface that has been coated with icing sugar. Add 10 drops of yellow gel food coloring, then evenly disperse the color throughout the dough by kneading. In order to acquire the correct shade of yellow, add additional color as needed.
Step 7: Make the frosting. With a hand mixer set to medium speed, add the butter to a medium mixing bowl and beat for one to two minutes. Beat in the remaining sugar and cocoa after adding them. Beat in the remaining sugar and cocoa after adding half the milk. The final bit of milk should be added, then beat for three to four minutes at medium speed.
Step 8: Give the frosting a color. You’ll need some black frosting for various accents on the Spongebob Cake, but the majority of the frosting will be used to layer the cakes and serve as a glue for the fondant. One-fourth of the frosting should be taken out and put into a different bowl.
Part 3: Assembling and Adding Decorations
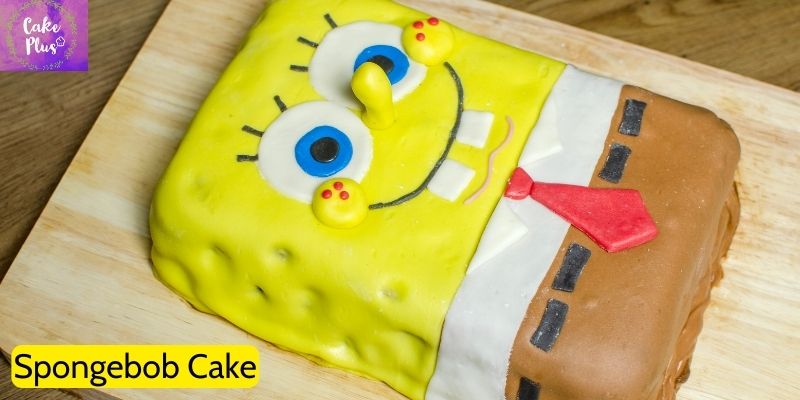
Step 1: Assemble the Spongebob Cake’s tiers. Each cake’s top should be leveled by removing a little portion with a long bread or cake knife. One Spongebob Cake should be placed on a serving dish or cake platter. On the cake’s surface, apply a layer of dark icing. Top the first cake with a second cake.
Step 2: Spongebob Cake frosting. After you’ve put the three layers of cake together, cover the top and edges of the cake with icing. To ensure that the fondant has an even surface to adhere to, smooth the frosting’s top layer.
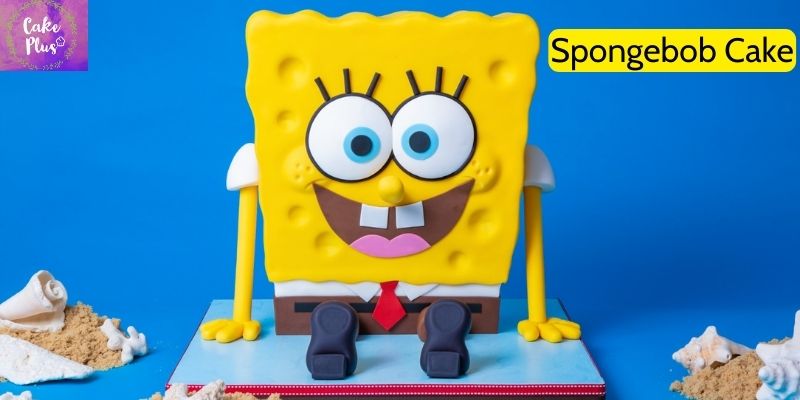
Step 3: Make the yellow SpongeBob body. Place the yellow fondant on a flat surface that has been coated with icing sugar. Roll the fondant into a rectangle that is one-eighth inch (0.3 cm) thick using a rolling pin.
Step 4: Make the brown pants. The brown fondant should be rolled out similarly to the yellow fondant. Trim the fondant’s top edge off in a straight line with a pizza cutter. This will be SpongeBob’s pants’ waistline.
Step 5: Create the white shirt. Similar to how you rolled out the yellow and brown fondant, shape the white fondant into a rectangle. A minimum of 10 inches (25 cm) length by 2 inches (5 cm) width should be specified for the rectangle.
Step 6: Punch the dimples. Punch several dimples all over the top and sides of the Spongebob Cake using a round cake tool, a sizable marble, or a golf ball. These are designed to resemble the sponge’s holes.
Step 7: Create the eyes. Cut two circles of white fondant with a 2-inch (5-cm) diameter round cookie cutter. Next, cut two 1-inch circles from a circle of blue fondant that has been rolled out to an eighth-inch thickness.
Step 8: Create the cheeks and nose. Create three balls with a half-inch diameter using the yellow fondant that has been broken off. One ball should be taken and stretched out in your hands into a 1-inch (2.5-cm) tube for the nose.
Step 9: Create the mouth. Create the mouth by gently cutting a slit into the fondant with a sharp knife. The slit connecting the two cheeks should be a concave semicircle in the middle of the Spongebob Cake.
Step 10: Make the tie. Square-shaped crimson fondant is rolled out. Cut out a 1.5 inch (3.8 cm) long diamond shape with an extended top using a pizza cutter or knife. Lay the tie lengthwise with the extended section at the top on top of the white and brown fondant in the center of the shirt.
Step 11: Describe the features. Put the black frosting in a pastry bag, then attach a little round tip to the bag. With the pastry bag, draw black lines around SpongeBob’s teeth, waistband, and other features.