Cake Recipe
A Guide to Crafting a Stunning Little Mermaid Cake in 4 Easy Steps
May
Everyone, in my opinion, goes through a mermaid phase as a child. You’ve come to the perfect place if your youngster asked for a Little Mermaid Cake for their birthday. This is a super-simple method for creating a stunning children’s birthday cake for a mermaid-themed celebration! Let’s explore with cakepluss.com
The necessary ingredients for Little Mermaid Cake
You will need a chocolate cake batter for this cake; you may either make your own or buy a packet mix from the shop (there is no judgment here). Buttercream ingredients (butter, icing sugar, milk, and food coloring), as well as candies and sweets, are needed to make the mermaid cake come to life.
- I put a buttercream recipe in the recipe card.
- To make the Little Mermaid Cake topper, you will also need a doll (a Barbie doll or something similar).
Instructions for making Little Mermaid Cake
Step 1: How to Make the Cake?
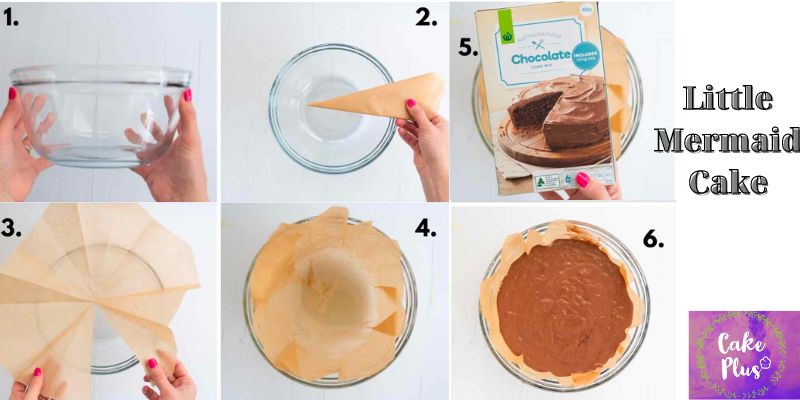
- Because I wanted the cake to have a circular dome form, I made it in a mixing bowl rather than a cake pan. Round cake tins are one option. (Mixing bowl measurements: 12 cm deep, 22 cm broad at its widest point.
- Dress up the mixer bowl: Baking paper can be folded repeatedly to create a long, narrow triangle. Measure to the edge of the bold and cut the triangle to this length while keeping the triangle’s point in the center of the bowl.
- Once the triangle is opened up, it will resemble a crude circle. one of the lines should be shortened to the center.
- At this point, you should be able to lower the baking paper into the bowl and fold it to fit using the creases.
- Make the chocolate cake batter: I made my recipe using two Countdown 450g chocolate cake baking mixes. If you would rather make the cake from scratch, my simple cake recipe would be fantastic.
- Pour into cake pans or bowls with linings.
- Bake the cake according to the recipe’s directions. The cooking time can be longer than in a typical cake tin if you use a large mixing bowl like I did.
- Allow to fully cool
Step 2: Prepare the Little Mermaid Cake layers and mermaid topping.
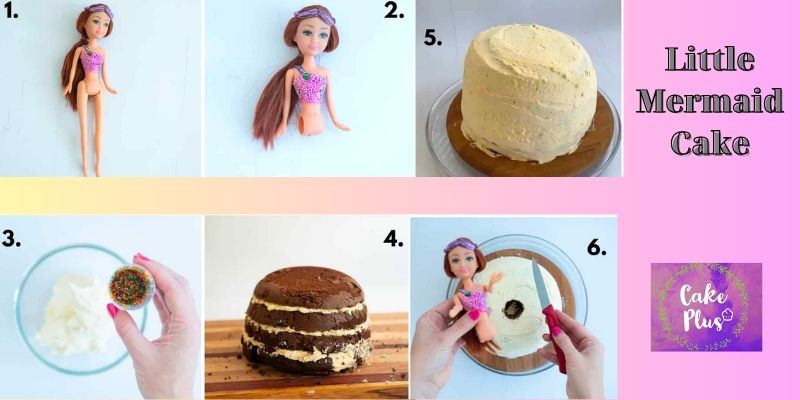
- To create your Little Mermaid Cake topper, detach the doll’s legs (pictures 1 and 2).
- After leveling my cake with a cake leveler, I divided it into 4 layers. Or just a bread knife would do. The cake may be simpler to cut with a bread knife if it has been cold or frozen. Less layers would also be acceptable. You decide.
- Save any cake scraps you may have after leveling the cake; you’ll use them to make the tail.
- Make the buttercream.
- To make funfetti buttercream, combine sprinkles with 1/4 of the plain buttercream. Sprinkles can be added in any quantity.
- Join the cake layers together using the funfetti buttercream.
- Crumb coat: Spread a thin layer of the uncolored buttercream (an additional 1/4 of it) over the entire cake. This is the crumb coat; when the colored buttercream is applied later, it will be simpler to frost the cake.
- You may use any remaining buttercream to create a mermaid tail later if you store it.
- To make a well on the cake’s top that will accommodate the doll’s base, use a small knife or spoon.
- Put the cake in the fridge to firm up the crumb coating. I usually do this overnight, but you could do it in an hour or so.
Step 3: Little Mermaid Cake frosting and embellishments
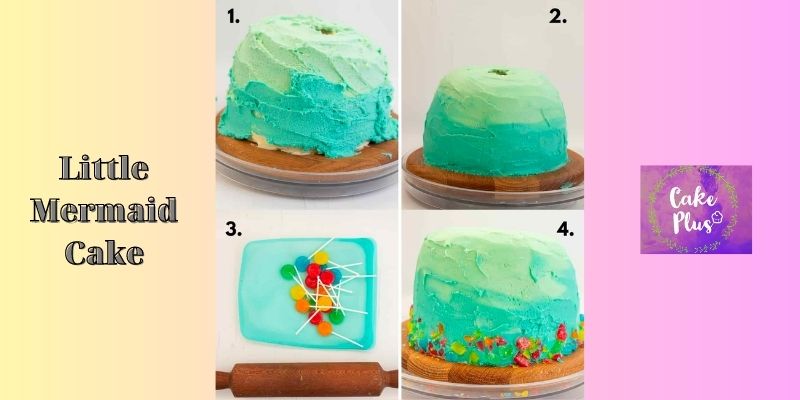
- You should have half of the buttercream left after coloring it. To make the icing a light blue tint, add a tiny amount of blue food coloring.
- Use a knife or a piping bag to roughly spread the remaining 12 of the light blue buttercream on the top half of the Little Mermaid Cake.
- To make the remaining buttercream a darker shade of blue, add more blue food coloring.
- Cover the bottom half of the Little Mermaid Cake with the deeper blue buttercream. spatula, knife, or piping bag.
- After dipping a metal cake spatula or bread and butter knife in hot water, shake it to remove excess water. You may create an ombré appearance by smoothing the buttercream with a heated knife.
- You may use any remaining buttercream to create a mermaid tail later if you store it.
- Put the lollipops in a bag made of plastic. The lollipops can be broken up using a rolling pin. Approximately 12 lollipops were broken, although I really only needed half of that number.
- To create the appearance of colorful coral and seaweed, press the broken lollipops around the cake’s base.
- Take 2 jubes and position these at the end of the tail to look like flippers, you could also use spearmint leaves for this.
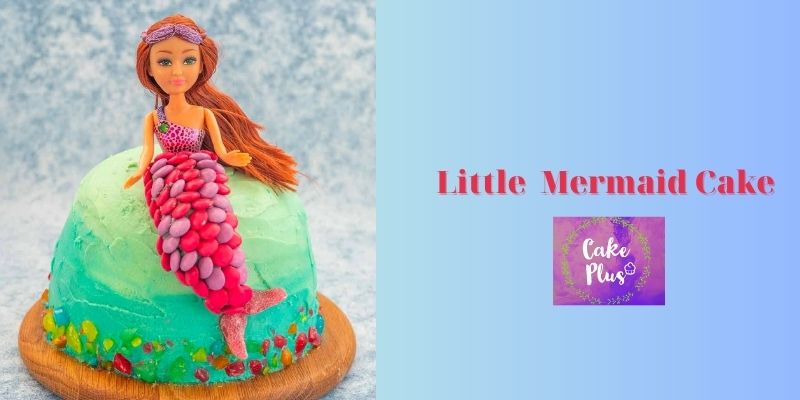
- Position the doll in the well, you may need to fill in any gaps with a little buttercream and candie. Your Little Mermaid Cake is now complete!
Step 4: Make a mermaid
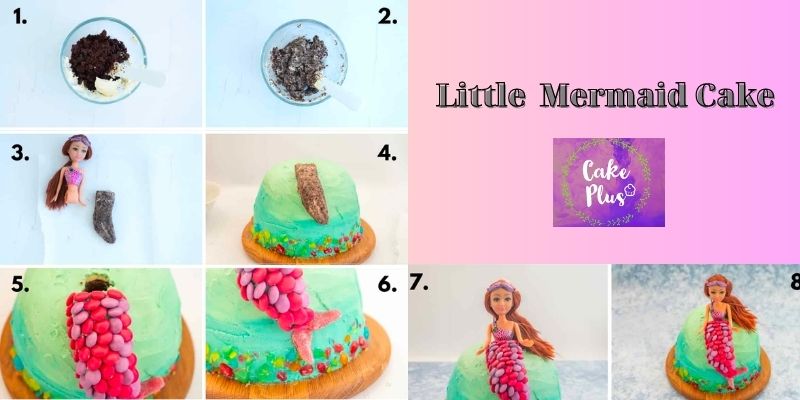
- Make the scraps left over after flattening the Little Mermaid Cake and crush them with your fingertips to create cake crumbs.
- Combine a small amount of remaining buttercream with these cake crumbs.
- The crumb buttercream mixture should be simple to deal with; shape it into the shape of a mermaid tail using your hands.
- Put the tail in front of the well you made for the Little Mermaid Cake topper on top of the cake.
- Use whatever color of buttercream to frost the tail, just enough to hold the sugar ornaments in place
- Cover the tail entirely with smarties or M&M’s arranged to resemble scales. I choose to use pink and purple Smarties, but you can choose any color scheme.
Conclusion:
Making a Little Mermaid cake is a fun journey that only needs to be completed in four crucial steps. These instructions will show you how to turn some basic items into a whimsical work of art that perfectly portrays the allure of the undersea realm. Each step is important in creating a cake that will wow everyone, from sculpting the cake layers to bringing the mermaid design to life with brilliant colors and edible ornaments.